|
|||||
© 2005 Rabek Engineering GmbH |

With a hand lever the bottle rack is
pushed down, the bottle pulled over the filling valve and
the rack tightened against the bottle from below. The special
construction allows adjustment of this rack for all individual
types of bottles. This is necessary so that each bottle
can be pressed against the filling valve with the required
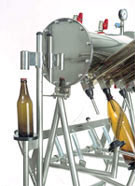
pressure. STEP 2: PRE-PRESSURIZING OF
THE BOTTLE WITH CO2 In order to fill carbonated beverages
into a bottle without foam, the interior of the bottle
must be brought the same pressure as the liquid. Due to
the valve design, CO2-gas from the bottling machine’s
gas chamber is guided into the bottle. This is done by
pulling the valve lever half way down. A slight rushing
sound is heard from the gas during this step.. STEP 3: FILLING OF THE BOTTLE After the bottle is pre-pressurized,
the handle of the filling valve is pulled down completely
which opens the beer or beverage-flow and causes the beverage
to flow into the bottle. When the predetermined filling
level (which can be adjusted according to the requirements)
is reached the flow stops automatically (the bottle can
not be overfilled). STEP 4: DEPRESSURIZATION OF
THE BOTTLE, TAKING OFF THE BOTTLE By pushing the handle of the filling
valve up, the excess pressure left in the bottle is released
into the air. By operating the lever of the bottle rack
the bottles can then be removed from the filler. STEP 5: CLOSING THE BOTTLE If the bottle is to be closed with a
crown-cork, it can be done with the integrated crown-corker.
Other caps are applied manually. STEP 6: CLEANING (CIP) & SAFETY The filler can be cleaned through the
use of the integrated CIP-sprayball. However, it is recommended
to clean the unit by hand for the most sanitary results.
For this the unit opens easily.
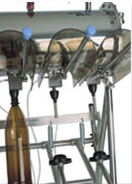

STEP 1: CLAMPING OF THE BOTTLE INTO THE BOTTLE RACK
Because it may happen that a bottle breaks during the filling process, each
filling station is secured by a polycarbonate safety hood.
![]()
![]()